
Antivirus programs are meant to keep the computer system away from viruses, malware, Trojan, etc. But when an antivirus program (like Norton) starts interfering with the functioning of the application software (like Mozilla Firefox, Internet Explorer), the situation becomes problematic.
In order to recognize whether the issue of not accessing the internet is due to Norton or it is something else, consider the time when Norton was not installed into the computer, was everything working fine at that time? Or after the installation of the Norton, you started facing problems accessing the internet. If the answer is yes, Norton is the culprit in your case.
Once you are sure that Norton has blocked the internet, this guide is going to provide help to overcome the issue. It is because, here, you will be provided with solutions in the form of steps. Using them, you can easily cope with the issue and resolve it.
So, let’s get started.
The firewall monitors and puts restrictions on the data being transmitted between the computer and the network. Whenever you are trying to access the internet, this firewall comes into play and restricts every unwanted data and unauthorized access. As a result, you browse the internet safely.
Windows operating system comes with an inbuilt firewall and once you install Norton, its firewall also starts operating. So, if you are not able to access the internet or the Norton firewall is blocking the internet, there is a need to disable the firewall for a while till you access the internet.
Below find the ways to disable the firewall on Windows and as well as on Norton.
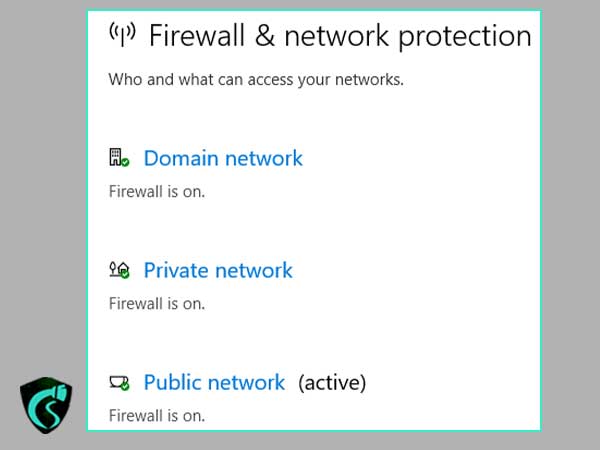
Step 1: Go to Start button > Settings > Update & Security > Windows Security > Firewall & network protection
Step 2: Select the active network profile, available profiles are Domain Network, Private Network, Public Network.
Step 3: A new window will open up, under Microsoft Defender Firewall, switch the toggle button to “OFF”. Get the idea from the below image.

Once you switch off the firewall, you will become vulnerable to unauthorized access. So, make sure you do not let it off for a longer period of time.
Step 1: Launch the Norton application by double-clicking on it.
Step 2: Search and go to “Settings”.
Step 3: Search and choose “Firewall”.
Step 4: A new window will be opened, Go to the “General Settings” tab under “smart firewall”.
Step 5: Now, switch the button to “OFF”.
Step 6: Click on the “Apply” button.
That’s it. Now, the Norton Antivirus’s firewall is disabled.
By default, certain application programs are blocked by the Norton antivirus like streaming media programs, network games, web browsers, etc. But if you want to access the internet on them, you need to go to the settings of Norton antivirus and make some changes.
So, If you are wondering how to allow programs through Norton? Follow the below steps.
Step 1: Launch Norton’s security application and go to “Settings” from its interface.
Step 2: Search and click on the “Firewall” option.
Step 3: Go to the “Program Control” tab.
Step 4: Select the programs on which you wish to allow internet access.
Step 5: Now, under the Access drop-down list, choose “Allow”.
Step 6: Once done, click on the “Apply” button.
Norton antivirus sometimes blocks programs due to suspicious activity and also disables the activities like downloading a file, auto-sync between the devices, and internet access to an application. But if you want to permit the execution of them, you need to turn off the Norton firewall protection. Find below the steps, to do the same.
Step 1: Log in to the computer system with the administrator user account.
Step 2: Go to the notification area on the taskbar and right-click on the Norton icon.
Step 3: Now, click on “disable auto-protect” and “Disable Firewall”.
Step 4: A security request window will open up, select the “duration” drop-down list and choose the duration of disabling the firewall or protection.
Step 5: Once done, click on the “OK” button.
Norton will automatically enable the protection feature once again after the selected duration is over.
Application Blocking alert prompts whenever a new application that is not registered in Application Blocking settings tries to access the internet. So, whenever such a prompt comes up on the screen, choose either to enable or disable the application as per your need. Also, this regular prompt becomes problematic while accessing the internet.
In some cases, it has been seen that the Application Blocking rule does not apply to the application and which results in a repeated prompt on the screen. So, there is a need to remove the Application Blocking rule and add it again.
Step 1: Start the Norton application by double-clicking on its icon.
Step 2: Norton’s main window will open up, choose “Settings”.
Step 3: Go to the left pane and click on the “Firewall” option.
Step 4: Now, go to the right pane, nearer to “Application Blocking” and click on the “Settings” icon.
Step 5: A list of applications will be shown to you, select the application for which you are getting continuous alerts.
Step 6: Click on the “Remove” button.
Step 7: A confirmation box will come up, click on the “Remove” button again.
Step 8: Now, Click on “Done”.
Once you are done with the above steps, restart the computer system and perform the below steps.
Step 1: Launch the Norton application and go to the “settings” from the menu.
Step 2: Click on the “Firewall” (see on the left pane).
Step 3: Click on the “Settings icon” next to “Application Blocking” (See on the right pane).
Step 4: Now, click on the “Add Application” option.
Step 5: A “Choose Application” window will open where you are supposed to select the required application.
Step 6: Click on “Choose”.
By following the above steps, the application will be added to the Application Blocking Rule with the default “allow” attribute and will not produce any hindrance by prompting again and again while accessing the internet.
Whenever any service or application tries to connect to the internet, Norton captures that request and throws a prompt on the screen, stating whether to allow or disable it. Sometimes the Connection Blocking rule does not apply to the application and results in repeated connection blocking alerts, which create issues while accessing the application via the internet.
To overcome this issue, you may either update the Norton antivirus or set up the connection blocking rule again. Steps for these are provided below.
Step 1: Launch the Norton application.
Step 2: Click on the “LiveUpdate” feature in the main window.
Step 3: Let the “LiveUpdate” run till all updates are downloaded and installed.
Step 4: Once it is finished, restart the computer system.
So, this way you can update the Norton antivirus.
Step 1: Launch Norton antivirus and choose the “settings” option.
Step 2: Choose “Firewall”, from the left pane.
Step 3: Now, click on the settings icon in front of the “connection blocking” option.
Step 4: Now a list of applications will be shown, choose the application showing repeated Norton alert.
Step 5: Now, click on the “Remove” button.
Step 6: Again on the confirmation window choose the “remove” button.
Step 7: Finally, click on the “Done” button.
Once you are done with the above steps, restart the computer system.
Step 1: Launch the Norton application and choose the “settings” option.
Step 2: Now, choose “Firewall” from the left pane.
Step 3: Click on the settings icon nearer to the “Connection Blocking” (on the right pane).
Step 4: Now, click on the “Add Application”.
Step 5: “Choose application” window will open up where you are supposed to select the required application.
Step 6: Click on the “Choose” option.
Are you unable to access the internet on Mozilla Firefox? Chances are Norton is blocking Firefox. So, there is a need to change the status of Firefox from block to enable. To achieve it, simply go through the below steps and get the issue resolved.
So, the steps are
Step 1: Double-click on the Norton application and click on the “settings” option.
Step 2: Search and locate the “Firewall” option from the left pane.
Step 3: Click on the “Program Control” tab.
Step 4: Now, select “Mozilla Firefox”.
Step 5: Choose the “allow” option from the dropdown list.
Step 6: Finally, click on the “Apply” button.
Once you are done with the above steps, restart the computer and later check whether you are able to access the internet on Mozilla Firefox or not.
If Norton has blocked Internet Explorer, there is no need to worry anymore, as the above steps will be applicable to Internet Explorer as well. So, in step number 4, select Internet Explorer instead of Firefox. Soon, you will be able to access the internet on Internet Explorer as well.

Writing has always been an interesting field for me since the very beginning when I started my graduation. I like to write about technical, semi-technical, creative writing, and many others. niches.